Types of Non-Destructive Testing
The different types of non-destructive testing are often complementary. As a result, we can exploit the advantages of combined techniques.
Non-destructive testing (NDT) is a combination of various inspection techniques used individually or collectively to evaluate the integrity and properties of a material, component or system without causing damage to it. In other words, the part that requires the use of one or more of those techniques can still be used once the inspection process is over. NDT is therefore often used for the detection, characterization and sizing of inherent discontinuities, as well as those associated with damage mechanisms. NDT is regulated by codes and standards according to the type of industry, country and other criteria. Society for Mechanical Engineers (ASME), ASTM International, COFREND, CSA, Canadian General Standards Board (CGSB), American Society For Nondestructive Testing (ASNT), etc. are well-know examples.
Types of non-destructive testing most frequently used
Many different NDT methods are available in the industry, each of them having their own advantages and limitations, but six of them are most frequently used: ultrasonic testing (UT), radiographic testing (RT), electromagnetic testing (ET), magnetic particle testing (MT), liquid penetrant testing (PT) and visual testing (VT).
Other techniques include acoustic emission testing (AE), guided wave testing (GW), laser testing methods (LM), acoustic resonance testing (ART), leak testing (LT), magnetic flux leakage (MFL), vibration analysis (VA) and infrared testing (IR).
NDT techniques appellation
The names of those techniques generally make reference to a particular scientific principle or to the equipment used to conduct the inspection. For example, ultrasonic testing is based on the propagation of ultrasonic sound waves in a material and magnetic particle testing uses very small particles which are affected by the application of a magnetic field..
Definitions of some key techniques
Phased Array Ultrasonic Testing (PAUT)
Phased Array inspection is based on the same physics as the Conventional Ultrasound inspection. The differences are mainly the probe technology and configuration as well as the acquisition instrument electronics. Possible Phased Array configurations are dependent on what the probe and electronics are capable of. Each element is controlled individually, therefore allowing for the generation of a customized ultrasound beam using a defined delay. Learn more

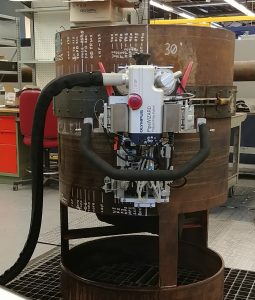
Calibration test intended for girth weld inspection using automated ultrasonic system PipeWizard
Automated Ultrasonic Testing (AUT)
Automated Ultrasonic Testing (AUT) consists of a motorized inspection system (the scanner), which manipulates the probes while tracking their position the entire time. In addition to weld inspection, the AUT technique is ideal for corrosion detection on difficult to access structures. It can also provide 100% coverage with an increased production of resulting data in comparison to traditional methods. Learn more
Conventional Ultrasonic Testing (CUT)
Conventional Ultrasonic Testing (CUT) uses a probe comprised of a piezoelectric element capable of deforming and generating high frequency acoustic waves that travel a specific velocity dependent on the material. Conventional Ultrasonic inspection is primarily used for thickness measurement, weld inspection, and for lamination and corrosion detection. Learn more
Time-Of-Flight Diffraction (TOFD)
Time-Of-Flight Diffraction (TOFD) is a technique based on an ultrasonic wave’s travelling time, or ‘time of flight’, and the diffraction produced by the extremities of the discontinuity. TOFD is recognized for its high level of accuracy and precision regarding sizing and is often used as a complement to the Phased Array method. Learn more
Full Matrix Capture (FMC)
Full Matrix Capture (FMC) is an advanced data acquisition and reconstruction method using PAUT probes. FMC is based on the synthetic focusing principle and is processed by algorithms resulting in a picture-like visualization of the area under examination. The resulting matrix can be processed by algorithms to produce the image. This process is called the Total Focusing Method (TFM). Learn more
Conventional Electromagnetic Testing (ET)
Eddy Current Testing (ET) inspection is based on the interaction between a magnetic field source, a coil, and the electrically conductive material to inspect. This result of this interaction is the induction of Eddy Currents (also known as electromagnetic induction). Discontinuities can then be detected by measuring and analyzing the intensity variations of the current. Learn more
Eddy Current Array (ECA)
Eddy Current Array (ECA) technology represents the evolution of the Conventional Eddy Current method. This technology offers a wider coverage and a greater sensitivity to potential flaws due to the multi-coil design. Eddy Current Array probes can be customized to best suit the application and required coverage; the number of coils and flexibility of the probe can be adjusted to inspect complex geometries, such as the teeth on gears. Learn more
Tangential Eddy Current (TEC)

Tangential eddy current: Detect and size surface-breaking cracks
Tangential Eddy Current (TEC) inspection is another technique based on magnetic induction. The main difference between Tangential and Conventional Eddy Current is that the coils are oriented tangential to the surface. Considering that eddy currents are created perpendicular to the surface, this orientation improves the depth positioning and sizing of flaws. Learn more
Pulsed Eddy Current (PEC)
Pulsed Eddy Current (PEC) inspection is a technology based on the magnetic field penetration through multiple layers of coating or insulation to reach the surface of a given material and induce eddy currents. This technique is generally used to measure thickness and to detect corrosion on ferrous materials that are covered with an insulation layer, fireproofing, or coating. Learn more
Small Control Area Radiography (SCAR)
Small Controlled Area Radiography (SCAR) is distinguished by using a compact exposure device. This instrument improves the efficiency of radiographic operations by making it safer, while maintaining or increasing productivity when compared with traditional exposure devices. Learn more
Magnetic Flux Leakage (MFL)
Magnetic Flux Leakage (MFL) inspection is based on electromagnetism and the measurement of permeability variations. The Magnetic Flux Leakage analysis confirms the presence of potential flaws due to wall thickness loss caused by corrosion or surface flaws such as cracks. Learn more
Conclusion
With so many different techniques, each having their own characteristics, some of them might be perfectly suitable for certain applications but utterly ineffective in other cases. For example, some methods are limited to surface examination while others allow a complete volumetric inspection. The different types of non-destructive testing are often complementary. As a result, we can exploit the advantages of combined techniques. Consequently, choosing the appropriate method is a very important step for optimizing the performance of an NDT inspection, it is thus essential to be well advised when preparing the inspection plan.
 WRITTEN BY ELIE MOREAULT, ENG.
Elie has been involved in numerous inspection campaigns at various utilities, performing analysis, data acquisition, site support, technical and procedure writing, as well as inspection process reviews for nuclear plant components, steel structures, pressure vessels, orthotropic bridges, composite parts and many more. As a trainer, Elie also teaches conventional ultrasound classes and is a member of the “Ordre des ingénieurs du Québec” as an Engineer. He graduated from the bachelor’s degree in Engineering Physics at Laval University in 2014 and has been working in the non-destructive testing sector since then.
About Nucleom
Nucleom is a Canadian non-destructive testing (NDT) company headquartered in Quebec City (Quebec), with offices in Montreal (Quebec), Toronto (Ontario), Kincardine (Ontario), Edmonton (Alberta) and Fort McMurray (Alberta). Providing a wide range of non-destructive testing services, Nucleom offers solutions that significantly increase the speed and reliability of inspections on critical equipment. Nucleom is pushing the boundaries of non‑destructive testing to safeguard the operation of critical infrastructures such as nuclear reactors and pipelines. Nucleom team works in Canada and around the world, primarily on Canada’s world-renowned CANDU reactor technology, to ensure these workhorses of the nuclear power industry continue to work safely and thus integrate the principles of social and environmental responsibility.
See also:
Article: FMC/TFM to get to know your component better
Contact page
